Posts

....
Technical Blog for .NET Developers ©

Showing posts with label sql. Show all posts

Saturday, December 8, 2012

SQL Server Jobs

In this post we are going to set up a SQL Job to monitor daily the sales table and produce statistical data in other table

We have the next SQL schema


And the next Stored proc to generate statistics

     
CREATE PROCEDURE P_GENERATE_STATISTICS
AS BEGIN

    DECLARE @HighestSale INT
    DECLARE @MostSoldProd INT
    DECLARE @SalesAverage MONEY
    
    SET @HighestSale =
        (SELECT TOP 1 IdSale
         FROM B_SALES WHERE CAST(SALEDATE AS DATE) = CAST({fn NOW()} AS DATE)
         ORDER BY Price DESC)
    
    SET @MostSoldProd =
        (SELECT TOP 1 IdProduct
         FROM B_SALES
         WHERE CAST(SALEDATE AS DATE) = CAST({fn NOW()} AS DATE)
         GROUP BY IdProduct
         ORDER BY COUNT(IdProduct) DESC)
        
    SET @SalesAverage =
        (SELECT AVG(Price)
         FROM B_SALES
         WHERE CAST(SALEDATE AS DATE) = CAST({fn NOW()} AS DATE))

    INSERT B_STATISTICS
    VALUES (DEFAULT, @HighestSale, @MostSoldProd, @SalesAverage)

END
GO


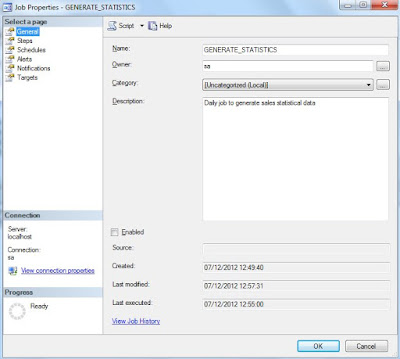
The first step to set up the Job is run the New Job Dialog at the SQL Server Agent folder. The main component of a job definition is the unique name that will be used to refer to the job


Go to the Steps tab and click New


In the Advanced tab, stablish the actions to perform in case of success and failure


In the Schedules tab, set up the triggering properties. In our case it's a recurring schedule type, with daily frequency


As a last step, we are going to set up a Notification to be sent when the Job completes with success, writing the execution information to Windows Application Event Log


The result of the Job is the next


The notification sent to Event Log can be checked through Event Viewer


<METHOD SOFTWARE © 2012>

Saturday, July 28, 2012

Linked Servers

It's a common scenario having two different servers of SQL, even different DBMSs, and sharing data from one upon another, in these cases the best option is using a linked server

In this example, we are going to create a linked server from SQL Server 2008 to MySQL

We have a table in MySQL database which we need to manipulate from SQL Server, this is the data


The first step in the process is add the MySQL ODBC Connector to our data sources, for this we will open ODBC administrator and configure a new DSN (Data Source Name), select the System DSN tab to configure a data source for the entire system. If you only want to create the DSN for a specific user, use the User DSN tab
You can download the ODBC Connector at the official page of MySQL

We configure the connector, and for more options, expand Details and check the boxes you need for your case


Now we can set up our linked server, navigate to Server Objects, Linked Servers, and add a new one

Configure it specifying the provider as Microsoft Ole DB for ODBC Drivers, and the product name and data source as the name specified in the DSN


You can also make this process through code


EXEC master.dbo.sp_addlinkedserver @server = N'MYSQL', 
@srvproduct=N'MySQL', 
@provider=N'MSDASQL', 
@datasrc=N'MySQL'

EXEC master.dbo.sp_addlinkedsrvlogin @rmtsrvname=N'MYSQL',
@useself=N'False',
@locallogin=...,@rmtuser=...,@rmtpassword=...

GO

EXEC master.dbo.sp_serveroption @server=N'MYSQL', 
@optname=N'collation compatible', 
@optvalue=N'false'
GO

EXEC master.dbo.sp_serveroption @server=N'MYSQL', 
@optname=N'data access', 
@optvalue=N'true'
GO

EXEC master.dbo.sp_serveroption @server=N'MYSQL', 
@optname=N'dist', 
@optvalue=N'false'
GO

EXEC master.dbo.sp_serveroption @server=N'MYSQL', 
@optname=N'pub', 
@optvalue=N'false'
GO

EXEC master.dbo.sp_serveroption @server=N'MYSQL', 
@optname=N'rpc', 
@optvalue=N'false'
GO

EXEC master.dbo.sp_serveroption @server=N'MYSQL', 
@optname=N'rpc out', 
@optvalue=N'false'
GO

EXEC master.dbo.sp_serveroption @server=N'MYSQL', 
@optname=N'sub', 
@optvalue=N'false'
GO

EXEC master.dbo.sp_serveroption @server=N'MYSQL', 
@optname=N'connect timeout', 
@optvalue=N'0'
GO

EXEC master.dbo.sp_serveroption @server=N'MYSQL',
@optname=N'collation name', 
@optvalue=null
GO

EXEC master.dbo.sp_serveroption @server=N'MYSQL', 
@optname=N'lazy schema validation', 
@optvalue=N'false'
GO

EXEC master.dbo.sp_serveroption @server=N'MYSQL', 
@optname=N'query timeout', 
@optvalue=N'0'
GO

EXEC master.dbo.sp_serveroption @server=N'MYSQL', 
@optname=N'use remote collation', 
@optvalue=N'true'
GO

EXEC master.dbo.sp_serveroption @server=N'MYSQL', 
@optname=N'remote proc transaction promotion', @optvalue=N'true'
GO

And it will be added to our list of Linked Servers


Now it´s time to check our new linked server, first with an INSERT statement, and after with a SELECT statement to retrieve all data


Notice we are using the three-dot notation to access the catalog schema, if you want to access other schemas you can use OPENQUERY, the syntax looks like this:

     
SELECT * FROM OPENQUERY(MYSQL, 'SELECT * FROM TEST.EXAMPLE')


<METHOD SOFTWARE © 2012>