Posts

....
Technical Blog for .NET Developers ©

Wednesday, July 3, 2024

Angular: HighCharts & SignalR

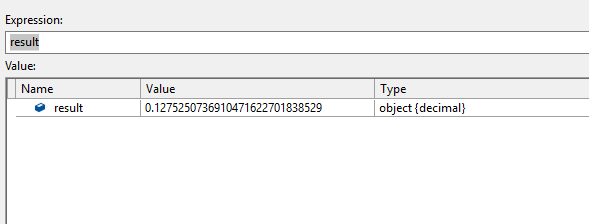
In this post we make a basic implementation of a graphic library, connected in real time with SignalR hub

High Charts Demos

The application is displaying data on the chart, generated from a SignalR hub, to test the versatility of implementation of this graphic library


The graph component has the next code, with html and scss styles

It is very important to implement the event chartInstance, to obtain a reference to the graphic chart

 
import {Component, EventEmitter, OnInit} from '@angular/core';
import * as Highcharts from 'highcharts';

@Component({
    selector: 'line-chart-component',
    templateUrl: 'line-chart-component.html',
    styleUrls: ['line-chart-component.scss']
})
export class LineChartComponent implements OnInit {

    Highcharts: typeof Highcharts = Highcharts;
    chartOptions!: Highcharts.Options;    
    updateFlag = false;
  
    data: number[] = [];
    categories: string[] = [];

    the_chart!: Highcharts.Chart;

    onChartInstance(chart: Highcharts.Chart)  : void {

        this.the_chart = chart;
    }

    ngOnInit(): void {
  
        this.chartOptions = {     
            title: {
              text: 'Demo'
            } ,                
            xAxis: {
                categories: this.categories
            },            
            series: [{
                type: 'line',
                data: this.data,                
                name: 'demo'
              }],            
          };              
    }
    

    addData(category: string, data: number) {

       this.the_chart.xAxis[0].categories.push(category);
       this.the_chart.series[0].addPoint(data);
    }    
  
}


<div class="divChart">
  <highcharts-chart 
    [Highcharts]="Highcharts"
    [options]="chartOptions"
    [(update)]="updateFlag"
    (chartInstance)="onChartInstance($event)">
  </highcharts-chart>    
</div>


.divChart {
    display:flex; 
    justify-content: center; 
    align-items: center; 
    flex-direction: column;
}


The SignalR connection and configuration is released in the event ngOnInit of the component

 
    ngOnInit(): void {

        this.signalr.startConnection();
        this.addSignalRListeners();        
    }    

    addSignalRListeners = (): void => {

        this.signalr.addListener('newConnection', this.onNewConnection );
        this.signalr.addListener('broadcastMessage', this.onBroadcastMessage );
    }

    onNewConnection = (connection: any): void  => {
        console.log(connection);
    }

    onBroadcastMessage = (message: any): void => {
        this.lineChart.addData(message.demo, message.total);
        console.log(message);
    }  


    public startConnection = () => {

        this.hubConnection = new HubConnectionBuilder()
                                .withUrl(environment.hubUrl, {
                                    accessTokenFactory: () => {
                                        return localStorage.getItem('token')!
                                    }
                                })                                
                                .configureLogging(LogLevel.Information)
                                .withStatefulReconnect()
                                .build();

        this.hubConnection
            .start()
            .then(() => console.log('Connection started'))
            .catch(err => console.log('Error while starting connection: ' + err)
            );
    }

    public addListener(evtName: string, fn: (result: any) => void) : void {

        this.hubConnection.on(evtName, fn);                        
    }   


METHOD SOFTWARE 2024 ©

Saturday, June 22, 2024

Azure Cosmos DB

Azure Cosmos DB is the Cloud Database for AI Era, its features make it the option for globally and fast access distributed databases: Azure Cosmos DB


In this post we are implementing access from Web Api to Azure Cosmos DB with a Generic Repository. Previously we have set up the resource and filled the containers in the database

The implementation of the library to access the database needs the database name, container, and account data

 
public static class CosmosDbConfiguration
{
    public static void ConfigureCosmosDb(this IServiceCollection services, IConfiguration configuration)
    {
        services.AddSingleton<ICosmosUsersLibrary>(InitializeCosmosClientInstanceAsync(configuration.GetSection("CosmosDbUsers")));
    }

    private static CosmosUsersLibrary InitializeCosmosClientInstanceAsync(IConfigurationSection configurationSection)
    {
        string databaseName = configurationSection.GetSection("DatabaseName")!.Value!;
        string containerName = configurationSection.GetSection("ContainerName")!.Value!;
        string account = configurationSection.GetSection("Account")!.Value!;

        // If key is not set, assume we're using managed identity
        string key = configurationSection.GetSection("Key")!.Value!;
        CosmosClient client;
        if (string.IsNullOrEmpty(key))
        {
            ManagedIdentityCredential miCredential = new ();
            client = new CosmosClient(account, miCredential);
        }
        else
        {
            client = new CosmosClient(account, key);
        }

        CosmosUsersLibrary cosmosDbService = new (client, databaseName, containerName);
        
        //DatabaseResponse database = await client.CreateDatabaseIfNotExistsAsync(databaseName);
        //await database.Database.CreateContainerIfNotExistsAsync(containerName, "/id");

        return cosmosDbService;
    }
}


public class CosmosUsersLibrary(
    CosmosClient dbClient,
    string databaseName,
    string containerName) : CosmosLibrary<CosmosUser>, ICosmosUsersLibrary
{
    public override Container Container 
    {
        get
        {
            return dbClient.GetContainer(databaseName, containerName);
        }
    }
}  


The Generic Repository is implemented in a base class, the abstract pattern is important to override operations such as logical delete or updates with dependencies

   
using Microsoft.Azure.Cosmos;

namespace Cosmos.Infrastructure;

public abstract class CosmosLibrary<T> : ICosmosLibrary<T> where T : ICosmosItem
{
    public abstract Container Container { get; }

    public async Task AddItemAsync(T item)
    {
        await this.Container.CreateItemAsync<T>(item, new PartitionKey(item.Id));
    }

    public async Task DeleteItemAsync(string id)
    {
        await this.Container.DeleteItemAsync<CosmosUser>(id, new PartitionKey(id));
    }

    public async Task<T> GetItemAsync(string id)
    {
        try
        {
            ItemResponse<T> response = await this.Container.ReadItemAsync<T>(id, new PartitionKey(id));
            return response.Resource;
        }
        catch (CosmosException ex) when (ex.StatusCode == System.Net.HttpStatusCode.NotFound)
        {
            return default;
        }
    }

    public async Task<IEnumerable<T>> GetItemsAsync(string queryString)
    {
        var query = this.Container.GetItemQueryIterator<T>(new QueryDefinition(queryString));
        List<T> results = [];
        while (query.HasMoreResults)
        {
            FeedResponse<T> response = await query.ReadNextAsync();

            results.AddRange([.. response]);
        }

        return results;
    }

    public async Task UpdateItemAsync(string id, T item)
    {
        await this.Container.UpsertItemAsync<T>(item, new PartitionKey(id));
    }
}


METHOD SOFTWARE ©©

Saturday, May 25, 2024

JWT Token Validation

There are different ways and technologies to validate a JWT Token, depending on the needs of securization of the infrastructure

This article deepens on theories and techniques of JWT Token validation: How to Validate JWTs in .NET

In this example we implement automatic validation with ASP.NET Core middleware, making emphasis on validate these pieces of the token: issuer, audience, and expiration time, which are the basic pieces to be validated


With this code we generate a JWT Token, codified in a string composed by header, payload, and signature


    public string GenerateToken(string user)
    {
        JwtSecurityTokenHandler tokenHandler = new ();
        byte[] key = Encoding.ASCII.GetBytes("B88CF37BEEE14F9DAA10DA3BDF23D9CA6EBD06E27A6D49C2867A211685A41E88");
        SecurityTokenDescriptor tokenDescriptor = new ()
        {
            Subject = new ClaimsIdentity(new[] { new Claim("id", "user_Id") }),
            Expires = DateTime.UtcNow.AddMinutes(1),
            SigningCredentials = new SigningCredentials(new SymmetricSecurityKey(key), SecurityAlgorithms.HmacSha256Signature),
            Issuer = "https://authdomain",
            Audience = "the_audience",            
            IssuedAt = DateTime.UtcNow,
            Claims = new Dictionary<string, object> { ["claim1"] = "test" }
        };
        var token = tokenHandler.CreateToken(tokenDescriptor);
        return tokenHandler.WriteToken(token);
    }


To validate the token from the api, configure the token at IoC to validate it as it is created originally from the source


        public static void ConfigureJWTToken(this IServiceCollection services, IConfiguration configuration)
        {
            byte[] key = Encoding.ASCII.GetBytes("B88CF37BEEE14F9DAA10DA3BDF23D9CA6EBD06E27A6D49C2867A211685A41E88");

            services.AddAuthentication(JwtBearerDefaults.AuthenticationScheme)
              .AddJwtBearer(JwtBearerDefaults.AuthenticationScheme, options =>
              {
                  options.Audience = configuration["Auth:Audience"];
                  //options.Authority : Gets or sets the Authority to use when making OpenIdConnect calls.
                  options.TokenValidationParameters =
                    new TokenValidationParameters
                    {
                        ValidateAudience = true,
                        AudienceValidator = new AudienceValidator((audiences, token, options) =>
                        {
                            // audience validator logic
                            return true;
                        }),
                        ValidateLifetime = true,
                        ClockSkew = TimeSpan.Zero,
                        ValidateIssuer = true,
                        ValidIssuer = "https://authdomain",
                        ValidateIssuerSigningKey = true,
                        IssuerSigningKey = new SymmetricSecurityKey(key),
                    };
              });
        }  


METHOD SOFTWARE 2024

Friday, May 10, 2024

.NET Maui

.NET Multi-platform App UI (.NET MAUI) is a cross-platform framework for creating native mobile and desktop apps with C# and XAML.

Using .NET MAUI, you can develop apps that can run on Android, iOS, macOS, and Windows from a single shared code-base.

Microsoft .NET Maui

In this post we set up the environment to develop Maui Apps with Visual Studio 2022

First create a new project of type .NET Maui App, and configure the emulator of Android devices


The emulator installs a serie of tools, you can type the next command to list the Android Virtual Devices installed on the machine


Ensure that Hypervisor is operational on the machine


Start the virtual device to debug the application, notice you can configure different devices to test the application


<METHOD SOFTWARE 2024>

Saturday, April 27, 2024

Redis Service Stack

ServiceStack's C# Redis Client is a simple, high-performance and feature-rich C# Client for Redis with native support and high-level abstractions for serializing POCOs and Complex Types supporting both native Sync and Async APIs

In this post we are installing Redis Server on WSL for Windows 11 OS, and using it from .NET Core Web Application

As a first step we are installing WSL from PowerShell with Admin privileges elevated

     
    wsl --install    


Now we have installed Wsl we need to update apt-get

 
  	sudo apt-get update
	sudo apt-get upgrade


Then we can install Redis server database

 
  sudo apt-get install redis-server


We have already installed Redis Server, now we are using it from our web application demo

 
    using ServiceStack.Redis;


        private IRedisClient GetRedisClient()
        {
            string conString = "redis://localhost:6379?ConnectTimeout=5000&IdleTimeOutSecs=180";
            RedisManagerPool manager = new(conString);
            return manager.GetClient();
        }  


            var client = GetRedisClient();
            var bookId = int.Parse(Request.Form["bookId"]);

            if (!client.GetAllItemsFromList("cart").Contains(bookId.ToString()))
            {
                var book = _context.Books.Find(bookId);
                book.InStock--;
                _context.SaveChanges();

                client.AddItemToList("cart", bookId.ToString());
            } 


<METHOD SOFTWARE 2024>

Wednesday, December 6, 2023

Implicit, Explicit, and Overload Operators

Implicit operators release data type conversions in a clear way, being very useful with complex types

Explicit operators require to code the conversion, being more specific of conventional conversions

Overload operators allow to write code for the operation. Overload is for Unary and Binary operators

In this post we implement an example for each case with the next code:


    public class Qubit
    {
        public double Spin { get; set; }

        public Qubit(double spin)
        {
            Spin = spin;
        }

        public static implicit operator EntangledQubit(Qubit qubit)
        {
            var quantizedAngularMomentum = 3.14159;

            qubit.Spin *= 2;

            return new EntangledQubit(qubit.Spin * quantizedAngularMomentum * 2);
        }
    }

    public class EntangledQubit
    {
        public double Spin { get; set; }

        public EntangledQubit(double spin)
        {
            Spin = spin;
        }

        public static explicit operator Qubit(EntangledQubit entangledQubit)
        {
            var quantizedAngularMomentum = 3.14159;

            entangledQubit.Spin /= 2;

            return new Qubit(entangledQubit.Spin / quantizedAngularMomentum / 2);
        }

        public static EntangledQubit operator ++(EntangledQubit entangledQubit)
        {
            entangledQubit.Spin *= 2;
            return entangledQubit;
        }
    }


            Qubit qubit = new Qubit(256);

            // implicit
            EntangledQubit entangledQubit = qubit;

            // explicit
            Qubit qubit2 = (Qubit)entangledQubit;

            // overload
            entangledQubit++;


Wednesday, January 12, 2022

C# & F# : Real Curry

This post is dedicated to extend a functionality coded in this previous post:

FSharp InvokeFast

Curry is a basic concept on functional programming, let's extend the defintion wth this post

Curry: Wikipedia, the free encyclopedia

In this post we code with C# Real Curry with the implementation of F#

We begin with the definition of a Curry Interface


    public interface ICurriedFunction<T, S, M, R>
    {
        /// <summary> Invokes the value Result
        R InvokeResult();

        /// <summary> Sets Arg1, Arg2, Arg3
        ICurriedFunction<T, S, M, R> SetArgs(Expression<Func<T>> funcArg1, Expression<Func<T, S>> funcArg2, Expression<Func<S, M>> funcArg3);

        /// <summary> Sets the Result and Curried functions
        ICurriedFunction<T, S, M, R> SetResultFunction(Converter<M, R> converter);        
    }


With this implementation


    public abstract class SpeciedFunction<R>
    {
        public abstract R InvokeResult();
    }
    
    public class CurriedFunction<T, S, M, R> : SpeciedFunction<R>, ICurriedFunction<T, S, M, R>
    {
        private FSharpFunc<T, FSharpFunc<S, FSharpFunc<M, R>>> Func { get; set; }

        private FSharpFunc<M, R> ResultFunc { get; set; }

        private FSharpFunc<S, FSharpFunc<M, R>> CurriedFunc { get; set; }

        private Expression<Func<T>> Arg1 { get; set; }

        private Expression<Func<T, S>> Arg2 { get; set; }

        private Expression<Func<S, M>> Arg3 { get; set; }

        public override R InvokeResult()
        {
            T argValue1 = this.Arg1.Compile()();

            S argValue2 = this.Arg2.Compile()(argValue1);

            M argValue3 = this.Arg3.Compile()(argValue2);

            R result = FSharpFunc<T, S>.InvokeFast<M, R>(this.Func, argValue1, argValue2, argValue3);

            return result;
        }

        public ICurriedFunction<T, S, M, R> SetResultFunction(Converter<M, R> converter)
        {
            this.ResultFunc = converter;

            this.CurriedFunc = FuncConvert.ToFSharpFunc<S, FSharpFunc<M, R>>(s => this.ResultFunc);

            this.Func = FuncConvert.ToFSharpFunc<T, FSharpFunc<S, FSharpFunc<M, R>>>(t => this.CurriedFunc);

            return this;
        }


        public ICurriedFunction<T, S, M, R> SetArgs(Expression<Func<T>> funcArg1, Expression<Func<T, S>> funcArg2, Expression<Func<S, M>> funcArg3)
        {
            this.Arg1 = funcArg1;
            this.Arg2 = funcArg2;
            this.Arg3 = funcArg3;
            return this;
        }
    }


The usability is via lambda Expressions


        void testCurried()
        {
            ICurriedFunction<Test, string, double, bool> curry = new CurriedFunction<Test, string, double, bool>();

            curry.SetResultFunction(getBool)
                 .SetArgs(() => getTest(), 
                          (s) => getTestString(s), 
                          (d) => getDouble(d));

            bool result = curry.InvokeResult();
        }       

        Test getTest() => new()
            {
                Id = 1024,
                Text = "Test Real Curry"
            };
		
        string getTestString(Test test) => (test.Id * 4000).ToString();

        double getDouble(string value) => Convert.ToDouble(value);

        bool getBool(double i) =>  i > 50;


METHOD SOFTWARE ® 2022

Thursday, October 21, 2021

Basic Validator

When we need to add logic rules with simplicity, we have the possibility of implement basic validations based on IoC principles

In this post we check the implementation of a ready-made generic validator


    public interface IValidator<M>
    {
        IValidator<M> AddRule(Expression<Func<M, bool>> rule);

        bool CheckRules(M item);
    }  


The interface is based on add boolean expressions


    public class Validator<M> : IValidator<M>
    {
        private List<Expression<Func<M, bool>>> Rules { get; set; } = new();

        public IValidator<M> AddRule(Expression<Func<M, bool>> rule)
        {
            this.Rules.Add(rule);

            return this;
        }

        public bool CheckRules(M item)
        {
            return this.Rules.TrueForAll(rule => rule.Compile()(item));
        }
    }


The implementation collects the rules


        static void Main(string[] args)
        {
            Console.WriteLine("Test Validator");

            Demo demo = new()
            {
                Kata = 200,
                Title = "Test"
            };

            IValidator<Demo> demoValidator = new Validator<Demo>();

            demoValidator.AddRule(d => d.Kata > 100)
                         .AddRule(d => !string.IsNullOrEmpty(d.Title));

            _ = demoValidator.CheckRules(demo);
        } 


METHOD SOFTWARE ® 2021

Thursday, July 29, 2021

FSharp : InvokeFast()

Microsoft defines InvokeFast() method to invoke an F# first class function value with two curried arguments. In some cases this will result in a more efficient application than applying the arguments successively
https://github.com/MicrosoftDocs/visualfsharpdocs/blob/master/docs/conceptual/fsharpfunc.invokefast

In this post we implement a basic use of FSharpFunc's InvokeFast, with a curried functions' structure

We begin top-to-bottom, so we first define a FSharpFunc which will takes a string param and will return a double value


              FSharpFunc<string, double> doublefunc = FuncConvert.ToFSharpFunc<string, double>((item) => getDouble(item));
              
              //
              
              static double getDouble(string item) => Convert.ToDouble(item);
  
After, we define a FSharpFunc which will takes a parameter type int, and will curry the function just created, with this implementation


  		FSharpFunc<int, FSharpFunc<string, double>> func = FuncConvert
                     .ToFSharpFunc<int, FSharpFunc<string, double>>(i => doublefunc);
  
Now we initialize a variable type int to test the functionality


            int o = 2;

            double test = FSharpFunc<int, string>.InvokeFast<double>(func, o, await getString_async(await getNumber_async(o)));  
  
  
<METHOD SOFTWARE 2021 ©>

Monday, January 4, 2021

Creating and Extending Cultures

When we are making use of Resources in order to display tags of different languages, we may need different displays for the same culture, depending on a specific area (i.e. dialects), or customizations in the content depending on the requirements

Registering a new culture is an action which requires admin privileges elevated, ideally from cmd. You have more info in MSDN

In this post we are extending an existing culture, and testing the customizations on the new culture. We are making use of System.Globalization namespace, and additionally adding a reference to sysglobl assembly


The code for registering the culture begins with the creation of the culture in disk


        CreateCultureAndSaveIt(@"D:\culture.xml");


This is the implementation:


        private static void CreateCultureAndSaveIt(string fileName)
        {
            CultureAndRegionInfoBuilder builder = new CultureAndRegionInfoBuilder("en-US-NY", CultureAndRegionModifiers.Neutral);

            CultureInfo parent = new CultureInfo("en-US");
            builder.LoadDataFromCultureInfo(parent);
            builder.LoadDataFromRegionInfo(new RegionInfo("US"));
            builder.Parent = parent;

            builder.RegionEnglishName = "New York";
            builder.RegionNativeName = "New York";
            builder.CultureEnglishName = "New York (United States)";
            builder.CultureNativeName = "New York (United States)";
            builder.NumberFormat.CurrencySymbol = "*";

            builder.Save(fileName);
        }


This method has created an xml file with the customizations specified


The next step is loading the culture into the system, this is made reading the ldml (language definition markup language) defined in the xml


            LoadCultureAndRegisterIt(fileName);


With the next implementation:


        private static void LoadCultureAndRegisterIt(string fileName)
        {
            CultureAndRegionInfoBuilder builder = CultureAndRegionInfoBuilder.CreateFromLdml(fileName);
            builder.Register();
        }


As result we have the culture installed into the system, in Windows/Globalization dir


Now it's time to test the new culture

Our web site has 2 sets of resources, and the next code in the index view


Sunday, January 3, 2021

Rosetta Code

This post is an implementation of this theorem proposed by RosettaCode.org, titled 100 doors


The only doors that remain open are those whose numbers are perfect squares.
Opening only those doors is an optimization that may also be expressed; however, as should be obvious, this defeats the intent of comparing implementations across programming languages.

I wrote the next algorithm in F#, with a slight difference which lead me to discover also the theorem of the distribution of odd numbers

The type Door:


The implementation of Visit Doors, and Set Matrix Doors:


The use of this algorithm is with C#, with a set of 1000 doors to review the results


Notice the distribution patterns of odds, fibonacci, and perfect square numbers on the board


METHOD SOFTWARE

Sunday, May 24, 2020

F# Experimental: BinaryTree

In this example we write the implementation of a very simple demo of use of FSharpX.Collections.Experimental.BinaryTree<T>

Binary Trees organize in the form of Root and Node(s) in the next way:


Install the Nuget for this demo:


We represent the hierarchy of a Demo class:


        class Demo
        {
            public int Id { get; set; }

            public int? HierarchyId { get; set; }

            public string Text { get; set; }
        }  
        
        // with the next function to get the collection
        
        static IEnumerable<Demo> GetDemoItems(int number)
        {
            for (int i = 0; i <= number; i++)
            {
                yield return new Demo
                {
                    Id = i,
                    Text = $"item{i}",
                    HierarchyId = (i == 0) ? default(int?) : (i < 3) ? 0 : (i < 5) ? 1 : (i < 7) ? 2 : 3
                };
            }
        }        


And now we simply build the binary tree structure and iterate over the branches with the print function


        static List<Demo> items;

        static void TestBinaryTree()
        {
            items = GetDemoItems(8).ToList();

            BuildBinaryTree(items);
        }

        static void BuildBinaryTree(List<Demo> items)
        {            
            BinaryTree<Demo> btree = GetBranched(items[0]);
            
            Print(btree);
        }

        static BinaryTree<Demo> GetBranched(Demo item)
        {
            if (item == null)
                return BinaryTree<Demo>.Leaf;

            Demo item1 = items.FirstOrDefault(i => i.HierarchyId == item.Id);

            Demo item2 = items.LastOrDefault(i => i.HierarchyId == item.Id);

            return BinaryTree<Demo>.NewBranch(item, GetBranched(item1), GetBranched(item2));
        }

        static void Print(BinaryTree<Demo> btree)
        {
            if (btree == null)
                return;

            if (btree.IsBranch)
            {
                BinaryTree<Demo>.Branch branch = btree as BinaryTree<Demo>.Branch;

                Console.WriteLine($"Id:{branch.Item1.Id} Text:{branch.Item1.Text}");

                Console.WriteLine("Items:");

                Print(branch.Item2);

                Print(branch.Item3);
            }
            else if (btree.IsLeaf)
            {
                Console.WriteLine("Leaf Tree");
            }
        }  
  
The result is this cmd:


<METHOD SOFTWARE 2020 ©>

Thursday, October 10, 2019

Constructing Expression Trees

Constructing Expression Trees in runtime encapsulates the logic of the tree into the Expression

In this post we have an example of Construct and Compile Lambda Expression, with a simple logic, the function receives a name and a number of request days, and for each day adds it to the result


            var test = ConstructRuntimeFunction();

            var i = test("test", 4);

            //
            //"test, 0 added, 1 added, 2 added, 3 added, 4 added"


The expression before compile is the next tree:


The implementation of ConstructRuntimeFunction is the next:


        static Func<string, int, string> ConstructRuntimeFunction()
        {
            var prmA = Expression.Parameter(typeof(string), "name");

            var prmB = Expression.Parameter(typeof(int), "request_days");

            var loopDays = Expression.Variable(typeof(int), "loop_days");

            var dayDate = Expression.Variable(typeof(DateTime), "day_date");

            var result = Expression.Variable(typeof(string), "result");

            var loopEnd = Expression.Label();

            MethodInfo method_add_day = Assembly.GetExecutingAssembly().GetType("Test").GetMethod("increaseDay");

            MethodInfo method_write = Assembly.GetExecutingAssembly().GetType("Test").GetMethod("addVisitDay");

            var func = Expression.Lambda<Func<string, int, string>>(

                Expression.Block(new[] { result }, Expression.Assign(result, prmA),

                Expression.Block(new[] { loopDays }, Expression.Assign(loopDays, Expression.Constant(0)),

                Expression.Block(new[] { dayDate }, Expression.Assign(dayDate, Expression.Constant(DateTime.Now))),

                Expression.Loop(
                    Expression.Block(
                        Expression.IfThen(
                            Expression.Not(
                                Expression.LessThanOrEqual(loopDays, prmB)),
                                Expression.Break(loopEnd)),

                    Expression.Block(new[] { dayDate }, Expression.Assign(dayDate, Expression.Call(method_add_day, loopDays))),

                    Expression.Assign(result, Expression.Call(method_write, result, loopDays)),

                    Expression.PostIncrementAssign(loopDays)),

                loopEnd)),

            result), prmA, prmB);
            
            return func.Compile();
        }


Sunday, October 6, 2019

LINQ Expression Trees

An expression tree is an efficient data representation of a query operator lambda expression. This data representation is evaluated all simultaneously, so that an individual query can be built and launched on a data source in once

Consider the next query with two operators expecting delegates as arguments:


        private static decimal[] celsiusDegrees = new decimal[] 
            {0.0M, 6.0M, 14.0M, 25.0M, 28.0M, 34.0M, 36.0M};

        private static IEnumerable<decimal> enumerableTemps = celsiusDegrees
            .Where(i => i > 30.0M)
            .OrderBy(i => i).ToArray();

        private static IQueryable<decimal> queryableTemps = celsiusDegrees.Where(c => c > 30.0M)
            .OrderBy(c => c).AsQueryable();


When the first code is compiled .NET IL emits code with two anonymous methods, one for each of the query lambda expressions

This query is evaluated and launched linearly, first Where operator, then OrderBy operator. This linear evaluation has performance for this example, but consider a query on a large dataset. These scena is when Expression Trees become necessary. Expression trees will be generated if the operator is declared to accept an expression of a delegate

These are the two different implementations of the Where operator:

Standard query operator in LINQ to Objects API, in System.Linq.Enumerable class


        public static IEnumerable<T> Where<T>(
                this IEnumerable<T> source,
                Func<T, bool> predicate);


Implementation in the LINQ to SQL API, in the System.Linq.Queryable class


        public static IQueryable<T> Where<T>(
                this IQueryable<T> source,
                System.Linq.Expressions.Expression<Func<int, bool>> predicate);


The result of this code is the next


        Console.WriteLine(enumerableTemps);

        foreach (var temp in enumerableTemps)
            Console.WriteLine(temp);

        Console.WriteLine(Environment.NewLine);

        Console.WriteLine(queryableTemps);
        foreach (var temp in queryableTemps)
            Console.WriteLine(temp);


The ease way to create expression trees is by using advanced LINQ features, however, a tree made up only of constans would be converted automatically at compile time, the aim is build parametric expressions, such as the formula to convert celsius to kelvin degrees : K = C + 273.15


        Func<decimal, decimal> CelsiusToKelvin = (c) => c + 273.15M;

        Expression<Func<decimal, decimal>> CelsiusToKelvinExp = (c) => c + 273.15M;


The first delegate instance is no different from a regular function, you can get an expression tree representation instead of the delegate simply declaring CelsiusToKelvin as an Expression<TDelegate>

The result of this code is the next


            Console.WriteLine(CelsiusToKelvin.ToString());
            Console.WriteLine(CelsiusToKelvin(34.2M));

            Console.WriteLine(CelsiusToKelvinExp.ToString());
            Console.WriteLine(CelsiusToKelvinExp.Compile()(34.2M));


Thursday, July 25, 2019

Performance Profiler

Measuring the responsivity of an application on the usage of resources is quitely important, on distributed applications such as ASP.NET

Performance Profiler is an analysis tool included in Visual Studio. In this sample we are using it on a Web application, this is the process and the results:

Click Performance Profiler menú or press Alt+F2, to open the Diagnostic Session

-> Select the target, click start and open the Performance Wizard


-> We are measuring CPU sampling


-> Indicate the Url and start navigating


The result is an interactive report of CPU usage


With representation of hierarchy calls


Method Software 2018 ©

Tuesday, July 23, 2019

Threading : Implementation of ContinueWith()

In Threading tasks can be ordered to run consecutively with the implementations of ContinueWith methods

In this post we implement examples of this method and make a review of the options enumerated in TaskContinuationOptions. With three examples of continuation and its options

Consider this code: (notice the commented lines to make functions 3 and 4 run)


        static void TasksContinuationsDemo()
        {
            CancellationTokenSource tokenSource = new CancellationTokenSource();

            CancellationToken token = tokenSource.Token;

            token.Register(() =>
            {
                Console.WriteLine("Cancelation's been requested");
            });

            Task<bool> initialTask = new Task<bool>(() => 
            {
                Console.WriteLine("Tasks continuation demo");

                token.ThrowIfCancellationRequested();

                // OnlyOnFaulted option
                // throw new Exception();

                Console.WriteLine(true);

                return true;
            }, 
            token);

            Task task2 = initialTask.ContinueWith(result =>
            {
                Console.WriteLine("Initial Task ran to completion");

                Console.WriteLine("Initial Task result is {0}", result.Result);

            }, TaskContinuationOptions.OnlyOnRanToCompletion);

            Task<int> task3 = initialTask.ContinueWith<int>(result =>
            {
                Console.WriteLine("Initial task faulted");

                Console.WriteLine("Task 3 result is {0}", 1);

                return 1;

            }, TaskContinuationOptions.OnlyOnFaulted);

            Task<bool> task4 = initialTask.ContinueWith<bool>(result =>
            {
                Console.WriteLine("Initial Task's been canceled");

                Console.WriteLine("Task 4 result is {0}", true);

                return true;

            }, TaskContinuationOptions.OnlyOnCanceled);

            initialTask.Start();

            // OnlyOnCanceled option
            // tokenSource.Cancel();
        }


With this result:


Now uncomment the //OnlyOnFaulted option

With the next result:


And now uncomment the //OnlyOnCanceled option

With the next result:


The enum TaskContinuationOptions presents these options:


MSDN

Monday, July 22, 2019

Reflection : Chapter 1

.NET Reflection is the art of meta-coding, obtaining information that describes assemblies, modules and types.

By Reflection it is possible to discover the structure of an assembly, instantiating types with its methods, fields, accessors, and so on.

In this sample we get a known method in a known type: Reflection.Sample.Sample.GetMultiply:


        public decimal GetMultiply(decimal initialData, double addedData)
        {
            return (initialData * 3.14159M) / (decimal) addedData;
        }


Set the call to the function:


            Assembly asm = typeof(Sample.Sample).Assembly;

            Module module = asm.GetModule("Reflection.Sample.dll");

            Type type = module.GetType("Reflection.Sample.Sample", true, true);

            MethodInfo method = type.GetMethod("GetMultiply");

            ParameterInfo[] @params = method.GetParameters();

            Type returnType = method.ReturnType;

            var result = Activator.CreateInstance(returnType);

            object[] setParams = new object[@params.Length];

            for (int i = 0; i < @params.Length; i++)
            {
                setParams[i] = Activator.CreateInstance((@params[i]).ParameterType);

                switch (setParams[i].GetType().Name)
                {
                    case "Decimal":

                        setParams[i] = 10.40M;

                        break;

                    case "Double":

                        setParams[i] = 256.2048;

                        break;
                }
            }

            var obj = Activator.CreateInstance(type);

            result = method.Invoke(obj, setParams);


Static Constructors

Static Constructors initialize the static fields/properties of the class/static class. Static Constructors donot allow access modifiers so will work in background with the instructions of initialization of static resources in the class

In this post we exemplify the construction of a class containing static fields


    public class Particle<T> where T : new()
    {
        static T StaticElement { get; set; }

        public T Element { get; set; }

        public double Density { get; set; }

        // ctor
        public Particle(double density)
        {
            Density = density;
        }

        // static ctor
        static Particle()
        {
            StaticElement = new T();
        }

        public Particle<T> MuteParticle(Func<T, Particle<T>> muteFunction)
        {
            return muteFunction(StaticElement);
        }
    }


.2018

Saturday, July 20, 2019

Composing Functions

In this post we implement the technique of Composing Functions

The idea of composing functions is based on the concatenation of operations

Consider the next code:


            int var1 = 100;
            int var2 = var1 * 1024;
            int var3 = var2 + 2048;


We could create functions to perform this and our code would be the next:


            int var1 = 100;
            int var2 = CalcVar2(var1);
            int var3 = CalcVar3(var2);


        int CalcVar2(int a)
        {
            return a * 1024;
        }

        int CalcVar3(int b)
        {
            return b + 2048;
        }


This then would be improved with Composition, which automates this step


        public static Func<TSource, TEndResult> Compose<TSource, TIntermediateResult, TEndResult>(
            this Func<TSource, TIntermediateResult> func1,
            Func<TIntermediateResult, TEndResult> func2)
        {
            return sourceParam => func2(func1(sourceParam));
        }


            var autoCalcVar1 = extensions.Compose(CalcVar2, CalcVar3);

            int result = autoCalcVar1(var1);

            Console.WriteLine(result);


Wednesday, July 17, 2019

WCF One Way Dual Methods

WCF Services can declare methods which are invoked in one way mode, this implies the method will be called but the client side will not expect a reply, so will continue its operations without time leaks waiting for a response. This configuration is optimal for operations which don't require feedback results

OneWay methods can be bi-directionals, through a dual configuration, allowing client and server initiate invocation calls to each other. This mechanism is very useful for long-running processes in case the client expects a reply

In this post we develop a dual communication through a wsDualHttpBinding endpoint. These are the key points of the mechanism:

  • The service will expose an interface with the definition of the callback method, this method will be also marked as OneWay
  • This interface will be implemented in the client side
  • The OneWay method in the service will use this implementation to communicate with the client side once finish tasks
  • The client side must not dispose the InstanceContext with the server til the communication ends, the callback from the server will be treated as an event


The first step will be the definition of the interface in the service

    
    [ServiceContract(CallbackContract = typeof(IBookServiceCallBack))]
    public interface IBookService
    {
        [OperationContract]
        int AddBook(string title, string isbn, string synopsis, int idAuthor);

        [OperationContract]
        int AddAuthor(string firstName, string lastName, string biography);

        [OperationContract(IsOneWay = true)]
        void SendNewTitlesToSubscriptors(DateTime booksAddedAfterDate);
    }


And this is the definition of IBookServiceCallBack


    [ServiceContract] 
    public interface IBookServiceCallBack
    {
        [OperationContract(IsOneWay = true)]
        void NotifyClient(string message);
    }


We will focus on the method SendNewTitlesToSubscriptors, which will invoke the notification event on the client side

    
    public void SendNewTitlesToSubscriptors(DateTime booksAddedAfterDate)
    {
        _subscriptorManager.SendNewTitlesToSubscriptors(booksAddedAfterDate);

        INotificationServiceCallBack notificationSend =
            OperationContext.Current.GetCallbackChannel();

        notificationSend.NotifyClient(string.Format(
            "New titles added since {0} have been sent successfully", booksAddedAfterDate));
    }


With this configuration the client reference will add the interface IBookServiceCallBack

      <service name="BookService.BookService">
        <endpoint address="CallBackService" 
        binding="wsDualHttpBinding" contract="BookService.IBookService"/>
      </service>


Now the code in the client side:


    private InstanceContext instance
    {
        get { return new InstanceContext(new BookStoreNotificationHandler()); }
    }

    private BookServiceClient client
    {
        get { return new BookServiceClient(instance); }
    }

    private void btnSendNewTitles_Click(object sender, RoutedEventArgs e)
    {
        DateTime booksAddedAfterDate = dpBooksAddedFromDate.SelectedDate.Value;

        Thread threadSendNewTitles = new Thread(() =>
            {                    
                lblSendStep.SetContent("Sending new titles, please wait...");

                client.SendNewTitlesToSubscriptors(booksAddedAfterDate);
            });

        threadSendNewTitles.Start();
    }


and the implementation of IBookServiceCallBack as an event handler:

    
    public class BookStoreNotificationHandler : IBookServiceCallback
    {
        public void NotifyClient(string message)
        {
            MainWindow.lblSendStep.SetContent(message);
        }
    }


* Notice that in both cases we have used the extension method SetContent in order to control the content of the components in threading, as specified in this post: WPF MainWindow Instance

The result of this mechanism is the next:


<METHOD SOFTWARE © 2016>